8.31.2010

For You

Card #2: For You

Circle Circus from Stampin Up is just about my favorite stamp set of the past year! I haven't really done all of the required research but I have used it A LOT since I bought it!
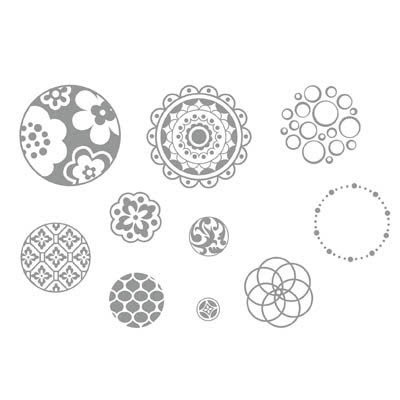


Circle Circus Stamp Set by Stampin Up (#115778 $28.95)


One of the greatest things about this stamp set is that EVERY SINGLE image has a punch to coordinate! No hand cutting!!! That and I think it can be very fun and funky or very elegant. You can see another project I made using this stamp set here.


The sentiment on the above cards come from this stamp set...


Great Friend Stamp Set by Stampin Up (#113792 $17.95)


I love both of the sentiments that come with this set and use them often. Like for this recent card.

To add bling to this card I used...


Jewels: Basic Rhinestone (#119246 $4.95 for 150 rhinestones!)

AND...

Rhinestone Brads: Clear (#113144 $10.95 for 84 brads in 3 sizes)


The color combo of this card is: Basic Black, More Mustard, and the NEW Cherry Cobbler!


I will have another new card for you all tomorrow! Hope you enjoy your day!


8.30.2010

Manly Birthday

The week after my card events, I will be posting one card each day. You saw the sneak peeks here. Now you get to view the whole card! I design 5 cards, so Monday-Friday you will get a sweet treat!

So here's card #1: A Manly Birthday Card

When I make a card for a man I normally make it pretty simple with clean lines and very few elements to "Wow" them...ha ha! Let's face it, most men just read the card and don't save it to re-create it like women do!

While this one was simple and easy, I love that is showcases one of the new big buttons you can get from the Holiday Mini (out September 1st)! It also uses the awesome Newsprint DSP...

Newsprint DSP (#117166 $9.95, page 175 of the IB&C).

Most patterns of this DSP pack are very manly. So this would be a great pack to get and create away for the men in your life!


Like I stated above, you will find that big button in the NEW Holiday Mini that you can start ordering from on September 1st! That's just 2 days away!!!

Big Designer Buttons (48 Buttons for $8.95)
#121002:Deck the Hall (Cherry Cobbler, Very Vanilla, Always Artichoke, and Crumb Cake)
#121718: Candy Cane (Garden Green, Baja Breeze, Blushing Bride, and Real Red)

8.29.2010

Sugar & Spice

When I saw this Sketchy Thursday sketch, I just knew I would find the perfect picture for it! I love circles lately...so this was perfect for me! Here is the sketch that they posted...

And here is my page...


Again I used Basic Grey's Olivia line of papers. They even had this cute little tag that says "Sugar & Spice". I punched a lot of circles and added a few buttons...


(close up)


...and I finished the page with the saying, "Sugar & Spice and everything nice...that's what little girls are made of."

Hope you enjoy this page as much as I do!


***Don't forget to scroll down, I posted two challenge entries today!***


Sweet Birthday

I am always in need of a birthday card it seems. So when I was creating my card for Get Sketchy's Challenge #53 that's what I ended up with! Here is the sketch that they posted...

And here's my card...


All of my patterned paper came from Basic Grey's Olivia line...I love that line! All of my buttons are Stampin Up. The looped line and "sweet" stamps came from the Dear Lizzy line of American Crafts. Then the "Ice Cream & presents and CAKE OH MY!" is from Stampin Up's Birthday Bliss stamp set.


I am in love with buttons lately. I think they are on almost every project I create! One of my favorites is the Bitty Buttons by Stampin Up. They are clear so they are perfect for layering over a sentiment for a little added flare. Can you find my Bitty Button on this card??


8.28.2010

SU Clearance Rack - NEW ITEMS!!!

***I forgot to mention that these items are only available on a first come, first serve basis...Basic Black cardstock is no longer in stock. Sorry!***

Stampin Up has updated items in their Clearance Rack!!! So go check it out!!! To get there you will visit my website. Click on "Shop Now" in the top right corner. Then click on "Clearance Rack" on the left side of the page.

Here are some of the things that are making their way to my house this week...

Basic Black 8.5x11 cardstock. (Don't know why they also have 12x12 in the picture...they don't have that for sale in the Clearance Rack.) You get a pack of 40 sheets for only $2.99!!!


Real Red Sending Love Epoxy Brads - $1.99!!!


Chocolate Chip Sending Love Epoxy Brads - $1.99!!!


I also added a few other items. Check them out...there are tons of Rub Ons, Buttons, Retired cardstock and DSP!


So go check it out. The only way that these items can be purchased is through my website. They will ship directly to your house. Shipping for orders under $70 will be $6.95. Anything $70 and over will be 10% of your total.

Place an online order (Clearance Rack or Current Merchandise or BOTH) through the end of the month (Tuesday, August 31st) and you will be entered in a drawing to win FREE shipping on your next order (must be ordered by emailing me and paying with cash or check) AND you will get a sampling of some of my favorite new products that Stampin Up has to offer!!!

So order away!!! And let me know if you have any questions. demokimsu@yahoo.com

Club Project #3: Glitter

You have seen this project before here. But the girls wanted to learn more about glitter and I thought this was the perfect summer-y application of glitter!!

To apply the glitter to the umbrella we used a two-way glue pen! After the image is stamped, just color the glue on and sprinkle the glitter! SUPER simple and SUPER cute!


Stamp Sets Used: Tropical Party (SU) and Great Friend (SU).

8.27.2010

Current Favorites

So my friend Jinny does Friday Faves on her blog. She asked what her readers were loving right now. So here goes...

Song Writers Clear Stamp Set by Sassafras: I just got this and can't wait to use it on a few cards!

Numerical Chipboard by Sassafras: I just got this as well...I'm excited to use it tonight at my crop on a scrapbook page or a card...hmmmm....


Wildside Chipboard by Sassafras: I can't wait to go to the zoo so I can use this!!!


Phead Count Paper Whimsies by Sassafras: Earlier this week Peachy Cheap had 4 different sets of these Paper Whimsies for $7.99 I think. I just LOVE them!


Fundamentals Applejack Paper by Sassafras: I don't know what I'm gonna use it for yet...but I will be using it for something cute, I know that much!


Are you sensing a theme yet? Could it be that I LOVE Sassafras or something??!!


A Walk in the Park Collection Kit by Echo Park Paper Co.: I have had this for about a month and I think I've made 5-6 layouts using this stuff! I love the colors...they are so great for summer!


Sweet Summertime Collection Kit by Echo Park Paper Co.: A friend of mine, Danielle, had this paper when we scrapbooked together last week and I just had to get some! Can't wait to use it tonight!

And now we get to my Stampin Up FAVORITES...
Designer Buttons - Brights Collection: I have ben using these on EVERYTHING! I love them and I still feel like I have a lot left, which is a good feeling for this embellishment hoarder!


Basic Rhinestones Jewel Accents: I love a little bling!


Satin Ribbon - Any Color: I love ANY color of Stampin Up's satin ribbon but Rich Razzleberry is my current FAV!


Newsprint DSP by Stampin Up: Love it and have been using it on a lot of projects! It makes a GREAT manly birthday card! You will see that in a few days!


Hope you liked my list of favorites! Have a happy weekend!


Club Project #2: Scrapbook Page

Yes...I like Twilight. I'm not a fanatic about it but when my friend invited me to attend "The Twilight Experience" how was I to turn down the offer??!! We saw all 3 movies in a row at the theater! Anyway...I had to do a scrapbook page to document the event!

This was the August club project for the scrapbookers! They also got to use the Newsprint DSP and a few of them remarked that they loved it and never would have thought that just from looking at it in the catalog! YAY! This was one that I looked at and had to purchase right away! (I just wish it was whisper white instead of very vanilla...but I'm working with it!)


Some of my favorite embellishments were used on this page: Buttons and Satin Ribbon.


We also used A LOT of punches to create these scallop accents!


Click on the photo to enlarge and get the full story of my adventures!


***SNEAK PEEK ALERT!!!***
See that HUGE circle under that tiny scallop?! I made it using the NEW Extra-Large (2-1/2") Circle Punch from Stampin Up (#120906 $16.95). Available in the NEW Holiday Mini which you can order from on September 1st!!

10 Cards for $15 Sneak Peek

I just finished my cards and thought I would post a little sneak peek for all of you. I will reveal the complete cards later this week. These sneak peeks are brought to you by...
2 bags were comsumed in the making of these cards! They really should make the 100 calorie packs bigger but keep them at 100 calories!


Each month I create 5 different cards. My customers can sign up to make 2 cards of each of the 5 designs (envelopes included) for $15. If you live in the Kansas City area and are interested in these events please email me at demokimsu@yahoo.com.

8.26.2010

Club Project #1: Poppin Pastels

So once a month I have a club that meets at my house for a little fun and a few projects! They each order a minimum of $25 each month and in return they all get the chance to be the hostess and earn FREE items once in the 6 month period! (***NEW CLUBS forming in January 2011!***)

This time around I have a mixed club of 4 scrapbookers and 2 cardmakers. So here is one of the projects the cardmakers created.

They wanted to learn the Poppin Pastels technique. So I dusted off my pastels...seriously haven't used these in years! We used the Newsprint DSP from the IB&C.

The Poppin Pastels part of this card is the green polka dots over the music note DSP.
To complete this technique you will need: Versamark, stamp, pastels, and a sponge dauber.
Step 1: Stamp your image using Versamark ink.
Step 2: Dip sponge dauber in pastels.
Step 3: Apply the chalk to the stamped image by dabbing.

So easy and so cute!!!

Stamp Sets Used: Contempo Alphabet (SU) and For All You Do (SU).

8.23.2010

Cupcake Toppers

Back in 2008 I read a post on one of my favorite blogs about cupcake toppers. They were so CUTE! So I decided to makes some of my own! They were cute too! And since I was hosting a baby shower for my Sister-in-Law, I figured I would make some toppers for them too (with my MIL's help because I made them the night before while scrapbooking with her...thanks)! Here they are...

They are super simple. All you do is stamp an image and punch out with the 1-3/8" circle punch, punch out two scallop circles, attach one scallop to the back of the toothpick with a big glue dot or dimensionals, attach the other to the front, adhere the circle stamped image to the middle of a scallop, and you are DONE! Super simple!


And here is the rest of the table in case you were wondering what we were munching on at the shower! YUM!!

Winner!!

I was the winner of challenge #51 at Get Sketchy for this card! Check out what I won here!! YIPPIE!!!

8.18.2010

Wedding Invitation

Don't you just love weddings? I love them!!! And we get to attend one soon! Our daugther is getting married! Not Brooke, Jessica...she's in her 20's...and so am I! Ha ha! Let me explain because some of you are confused!

A few years ago we volunteered to have a student live in our home through a program that our church has for college students. Jessica was on staff of this program and she moved in with us in September of 2006 (I think). Anyway, most of the students call their host families by the normal names of Mom and Dad and Sister and Brother...just like at home. So only 3-5 years older than her, we were her parents! Ha ha! She lived with us for 2 years and now she's gotten all big and is getting married! They grow up so quickly, don't they?!

A few weeks ago we got their wedding invite in the mail and I just had to share it because it's totally handmade and TOTALLY CUTE!!!

Here's what they looked like when you took it out of the envelope.


Then you untie it.


And you see this....On the top there is a cute picture with the invite information printed on vellum over it, tied with the same ribbon from the outside. Then on the bottom portion there is a pocket with other wedding information in it.


And you just pull the cards out to read it all.

Isn't that SO CUTE?!!! She said they were a pain to make but they are so cute it was so worth it, I'm sure!

Can't wait until your wedding in September! We love you daughter!